
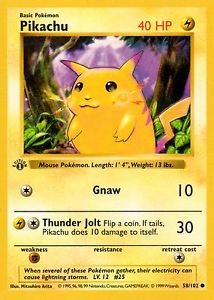
A Pokémon card has two sides, like a playing card. The back of each card in a deck is the same. The front of each card gives information about one character. Here’s a typical front & back:
The problem with making a two-sided card is that it’s hard to line up the sides if you print them on opposite sides of the same page. There are a couple of ways to get around this. One would be to cut them out and glue them together, but that can be hard to line up as well. Another way – the way we’re going to do it – is to put both sides against each other and fold them together. Here’s our starting pattern:

The two areas labelled FRONT and BACK are the dimensions of a Pokemon card. If you fold the printed paper exactly on the center line and trim exactly on the other lines, you’ll have a card that’s the right size with color all the way to the edge of the card. The problem here is that no one ever does it perfectly. Even machines mess up. That’s what the BLEED area is for. The bleed continues the color or pattern from the edge of the card, but it doesn’t contain any important information. That way, if your cutting or folding is slightly off, you still have color all the way to the edge.
By the way, these instructions won’t go through making ever single part of the card. There’s a lot of repetition, and to show every step would make this far too long. This is a more advanced project that assumes you know how to do things like mask and transform images, use layer effects, and add & manipulate text.
The Card Back
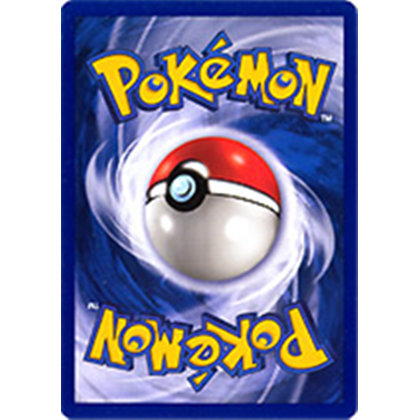
The back of the card has a swirly background, a Pokéball, the name of the game (twice), and a border.
In place of the Pokéball, I’m going to use our mascot’s head. You can use whatever you want- just cut it out of the original image, paste it in, and transform it to the right size.
For the text, I’m going to download a Pokémon font. I’m going to use warp text to bend it into an arc, and add a border with layer effects. Then I’m going to duplicate the layer and turn the copy upside down.
Here’s what that looks like:

Make a new layer under the text and image. Name it something so you know what it is, like “card back fill.”
Make sure Snap is checked (on the menu, View > Snap).
Select the rectangular marquee tool. Select the area of the card by clicking one corner of it and dragging to the diagonal corner.

Fill the area with the color of the card back.
Press Command-D (Windows, ctrl-D) to deselect the area.
Select the Rectangle Tool. Set the rectangle to have no fill, and a 40 pixel border with the color of the card border.
Draw a rectangle around the edge of the card. Name the rectangle letter “card back border.”

There are many ways to make the swirls. The best would be to draw them with a tablet, but you can also draw lines through the center of the card and then use FIlter >Liquify > Twirl clockwise to make a simpler pattern.

Much of the front of the card is made the same way. Instead of a swirl, there’s a gradient fill. The text is less complex, but there’s a lot more of it. The circles are made the same way you made the rectangles. Select and hold on the rectangle tool to see the other shape tools.
You’ll need to make your character as well. I made mine in a separate document and pasted him in.
Here’s the completed card:

If you’re not planning to print, you can stop here. If do want to print, you need to do two more things. Fill the bleed area with the card edge colors, and hide the guide text group.
Here’s a ready-to-print version:

Remember: This is a complex one! If you get lost, ASK!