
All cameras work basically the same way. Light is focused on a light sensitive material. Another way to say that is that the light sensitive surface is exposed to light. In older cameras the light-sensitive material might have been a flat surface (a sheet of glass, metal, or plastic) coated with chemicals that react to light. In a digital camera, the material is an electronic sensor. Whatever the material is, the camera controls the direction and amount of light that makes contact with the material. Not enough light and the picture will be too dark. Too much light and the picture will be too bright.
There are three ways to control the light: The size of the hole letting in the light, the length of time the hole is open, and the sensitivity of the material being exposed to the light. Each one of these methods also changes the appearance of the picture.
Here’s a chart that shows how each method works:
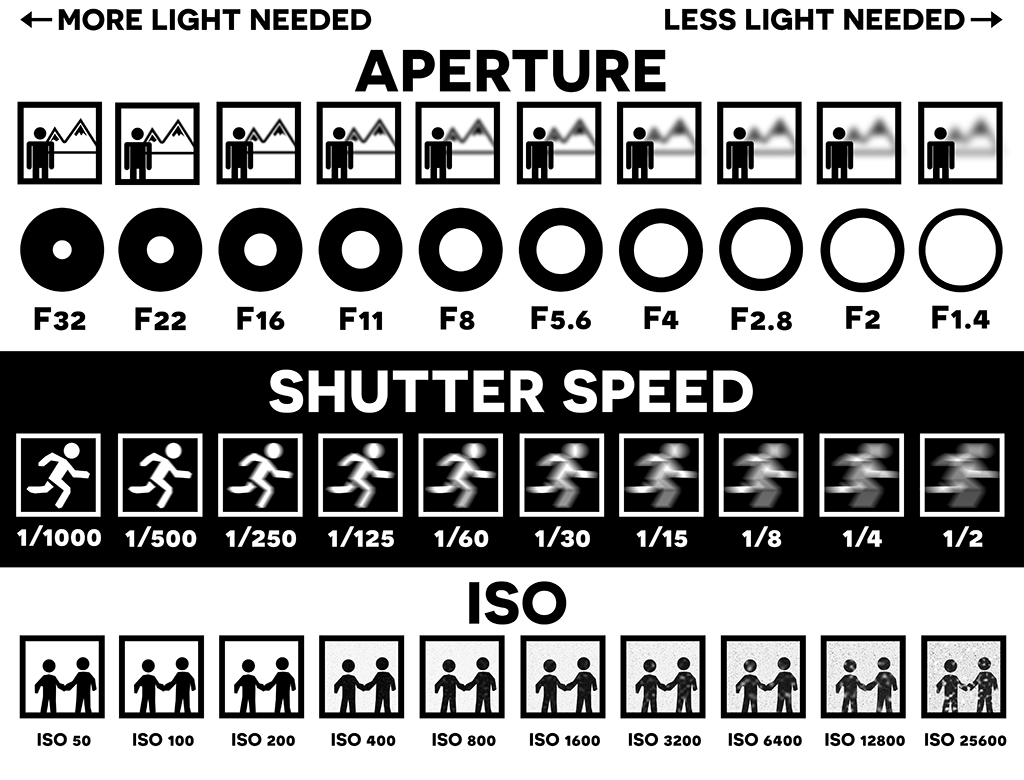
Aperture is the size of the hole letting in the light. As the hole gets larger, you need less light. But the size of the hole also changes the depth of field (DOF). A small hole has a deep DOF: The man and the mountains are both in focus. A large hole has a shallow DOF: The man is in focus, but the mountains are blurry.
Aperture sizes are called f-stops. Remember: The larger the number, the smaller the hole.
Shutter Speed is the length of time the aperture stays open. Fast apertures require more light, and slow ones require less. Fast apertures can freeze action. Slow apertures cause movement to blur.
The ISO is the sensitivity of the material for light. Most people say each letter (I-S-O), but the original plan was that it would be pronounced eye-so. ISO is a shortened version of the Greek word isos, which means “equal.” Higher ISOs require less light, but they also cause images to gain noise, making the image look like it has a lot of grain (sort of like the picture is made of sand).
Your job as a photographer is to balance the aperture, shutter speed, and ISO to create an image that is properly exposed and best shows the subject of the image. This can be tricky, but DSLRs have a built in tool called a light meter that will help you figure out if your exposure is correct. You can see the information from your camera’s light meter at the bottom of the viewfinder window, along with other important information. Every model of camera has a different viewfinder, but they usually have an arrangement similar to this:

There’s a lot of information here! We’re going to look at four things.
- 5.6 (just left of center) is the aperture, currently f5.6.
- 160 (to the left of the aperture) is the shutter speed. The number displayed is the denominator of a fraction. 160 means 1/160th of a second. As this number gets larger, the fraction of a second gets smaller and the shutter is faster.
- ISO 200 is (surprise!) the current ISO.
- The number line with a pointer (the triangle) at the bottom is the readout from the light meter. Usually you will want to adjust aperture, shutter speed, and ISO so that the pointer indicates 0.
How to figure out which light settings to change
Your settings are going to depend on your subject and the amount of available light. You will not always have the light you want, and you will have to compromise. Here are some basic ideas about how to set up some standard photos.
- Portraits: you usually want the subject in focus and the background out of focus. Use a larger aperture. Remember: larger apertures have smaller numbers!
- Large groups, big outdoor shots (the Grand Canyon, looking down a long street): you want as much in focus as possible. Use a smaller aperture.
- Action: If you want to freeze the action, use a fast shutter speed. If you want to show the motion as a blur, use a slower shutter speed.
- Low light (indoors without a flash, night): try a higher ISO. Remember: higher ISOs mean more noise!
These are not laws. They are guidelines. I strongly recommend you try breaking them.